Old Money Makeup: An Easy Tutorial for an Understated Look
Defined eyes, a little blush, and lips that share the attention. My approach to old money makeup, with a ten-minute routine and a thoughtful mix of affordable finds and splurges.
Very dark, very glossy lipstick has taught me something about my own taste: I don’t always want my lips to arrive before the rest of my face.
I like defined eyes. A wing, a little smokiness, enough shape to make the makeup feel intentional. But when I add a dark, reflective lip, the balance can shift further than I want. Suddenly, the lips are the whole conversation.
That’s probably why my version of old money makeup starts with restraint, although I wouldn’t describe it as barely-there makeup. I still want to see the eyeliner.
My skin is fair and a little dry. I prefer a modest amount of rosy blush, some contour, and lashes that don’t look overly thick. Ten minutes is usually enough for me. For an occasion, I make the same look more dramatic: a longer wing, a deeper smoky eye. There isn’t a completely different person underneath it.
This guide takes that approach and makes room for different skin tones, budgets, and preferences. The goal is a look you can understand well enough to make your own.
What is old money makeup?
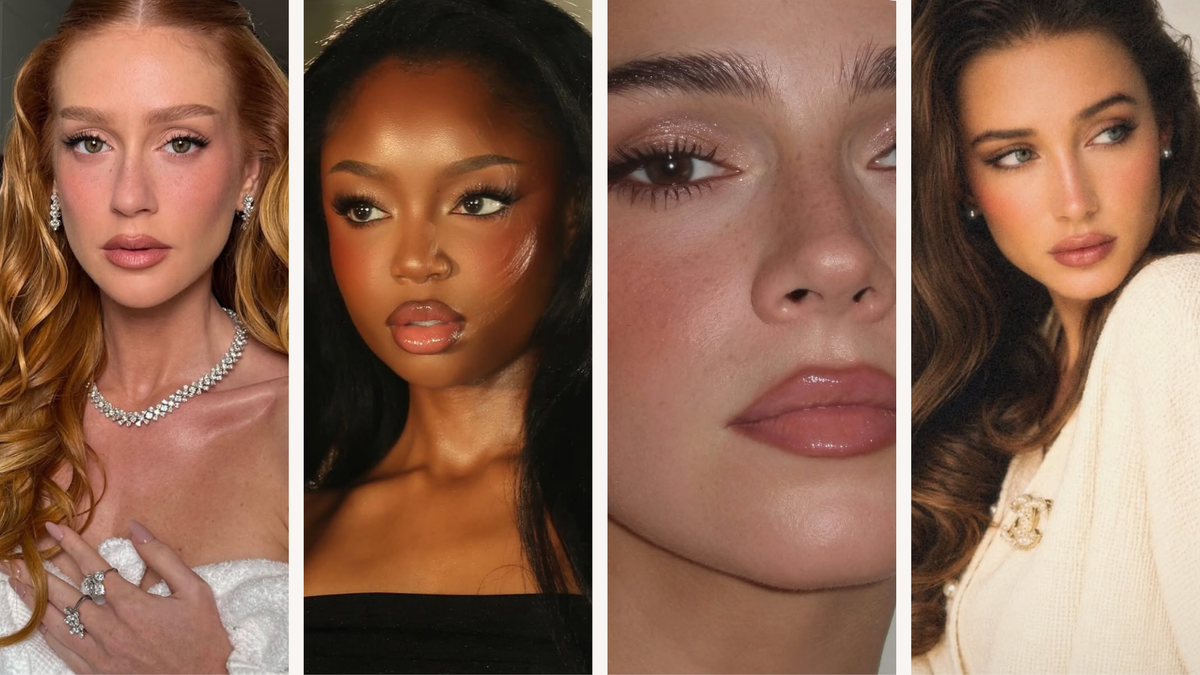
Old money makeup is a beauty aesthetic built around an even-looking complexion, softly defined eyes, considered cheek color, and balanced lips. It usually favors blended edges and controlled shine over dramatic contrasts across every feature.
The name describes an internet aesthetic, not a reliable account of how wealthy women actually wear makeup.
Makeup artist Emily Gray describes the look in terms of refinement, softness, and enhancement in her guide for Catrice. Those are useful starting points because they describe an effect rather than a shopping requirement.
You can create that effect with drugstore products. You can also enjoy a beautiful luxury compact without pretending it is essential.
And you don’t need flawless skin. Texture, lines, freckles, and unevenness don’t disqualify anyone from an understated makeup look.
Decide what you want people to notice
Before choosing products, decide where you want the definition.
For me, it’s the eyes. That means I’m happier giving a little more attention to liner and keeping the cheeks and lips quieter.
If you love lipstick, your version might reverse that balance: a defined rose or red lip with simple lashes and minimal shadow. Someone else might prefer softly flushed cheeks and a barely defined mouth.
This is a useful way to avoid buying an entire collection. You’re choosing a point of emphasis, then deciding what supports it.
For the routine below, I’d gather:
- A moisturizer and your usual daytime sunscreen.
- A complexion product that suits your skin, plus concealer if needed.
- A brow product only if you use one.
- A neutral shadow and eyeliner.
- Mascara.
- Blush, with optional contour.
- Lipstick or liner in a shade that works with your natural lip color.
You don’t have to apply everything. A neutral shadow you already own may be enough; a new six-shade palette isn’t an entrance fee.
Start with a base that still looks like your skin
With slightly dry skin, my priority would be comfort and a smooth-looking finish. I wouldn’t choose a very matte base simply because a reference photograph looks perfectly powdered.
Apply your usual moisturizer and daytime sun protection, allowing them to settle before makeup. The ten-minute makeup routine comes after that preparation.
Then look at your face before reaching for foundation.
Where do you actually want coverage? Around the nose? Across the cheeks? On a particular mark? Start there, blending outward, rather than automatically applying the same amount everywhere.
A skin tint can work if you want light coverage across a larger area. Foundation can work too. You can use a small amount of a fuller-coverage formula; you aren’t obliged to apply it as a full mask.
For concealer, begin with a small dot and build only where needed. A large sweep under each eye may give you considerably more product than you wanted.
One affordable option to investigate is e.l.f. Hydrating Camo Concealer. The brand describes it as full coverage with a satin finish. That makes it worth considering for targeted coverage, but “hydrating” doesn’t mean every dry-skinned person will love it, or that a thick layer will behave like a thin one.
NARS Radiant Creamy Concealer is a higher-priced alternative to explore if you prefer a luminous finish. These are researched options, rather than two products I’m claiming to have tested against each other.
Match spot concealer to the surrounding skin. If you want under-eye brightening, keep the difference considered rather than automatically choosing something several shades lighter.
Finish by checking the edges around your nose, mouth, and jaw. If you need powder, place it where you need control or setting. Dry cheeks don’t automatically need the same treatment as a shiny forehead.
Give your brows a little structure
Brows can provide enough framing that you need less makeup elsewhere.
Brush them into a shape you like. If there are gaps you want to fill, use small strokes rather than drawing a solid block from the inner corner to the tail.
You don’t need to make both brows identical. Work with the shape you have and check the overall effect from a normal viewing distance.
A pencil may be enough. A gel may be enough. You don’t necessarily need pencil, powder, gel, concealer, and a sharply outlined lower edge.
For this look, I’d keep the fronts softer and put any extra definition where the brow actually needs it.
Define the eyes without covering the whole lid in darkness
This is the part of the routine I care about most.
A simple old money eye makeup look can start with one neutral shadow. Choose a shade that adds gentle depth against your skin: taupe, soft brown, cocoa, or a muted rosy brown.
Sweep a little over the lid or through the crease, then blend the visible edge. Keep checking with your eyes open. The placement that looks beautiful on a closed eyelid may disappear or look different once you’re looking straight ahead.
For hooded eyes, an open-eye check is particularly useful. Place the definition where you can actually see it instead of following someone else’s crease placement exactly.
An e.l.f. Bite-Size Eyeshadow palette is one compact option to browse. Choose based on the colors you’ll use and how they appear against your skin. You don’t need to use all four shades, and you can leave shimmer out entirely.
Then add liner close to the upper lashes.
If drawing one clean line feels difficult, try short strokes along the outer half first. Connect them, then extend a small wing while looking straight ahead. A little softness at the edge can be more forgiving than repeatedly thickening the line to correct it.
The NYX Epic Wear Waterproof Eyeliner Stick comes in Deepest Brown and Pitch Black, among other shades. It’s a pencil option to consider for definition; the waterproof formula is designed to set, so don’t assume unlimited blending time.
Brown isn’t automatically the elegant choice, and black isn’t automatically too much. Brown can give a gentler contrast on some complexions. Black may provide the definition someone else needs without looking particularly dramatic.
The width and placement of the line matter as much as the color.
Keep the lashes separate enough to see the work
Thick lashes aren’t my preference. I’d rather the liner and eye shape remained visible.
Start with one coat of mascara, working from the roots toward the tips. Assess before adding more. If a clump forms, separate it while the formula is still workable instead of coating over it.
e.l.f. Lash XTNDR Mascara is a researched budget option here. The brand describes it as a buildable tubing mascara with a separating brush. It can create a more dramatic result, so the application still determines how restrained your lashes look.
You don’t have to coat the lower lashes if you dislike the result. You also don’t need false lashes to make an occasion look feel finished.
Let blush bring the face back to life
I like a little rosiness, rather than a very obvious flush.
Begin with less blush than you think you need. Place it where you enjoy seeing color on your cheeks, then soften the boundary into your base. Check both sides in similar lighting before deciding one needs more.
Cream and powder can both work. Choose according to the finish you like and how the formula behaves over your existing products.
This is also where I admit that product names can get to me. Surratt’s Peau de Pêche and Grisaille are beautiful names. I appreciate that sense of character in makeup, even though a lovely name can’t choose a flattering shade for you.
There’s an important practical distinction between those two. Surratt describes Peau de Pêche as a matte true peach and Grisaille as a medium taupe contour. They sit within the Artistique Blush range, but they don’t do the same job.
Peau de Pêche is a splurge option to investigate if peach is the direction you want. It isn’t a universal recommendation for every complexion.
If you enjoy contour, add a small amount where you want a suggestion of shadow and blend the edges carefully. You don’t need a stripe beneath each cheekbone or a complete face-shaping routine.
Grisaille is one contour option, but its depth won’t suit everyone. Choose a product that creates believable dimension on your own skin.
Choose a lip that belongs with the rest of the face
My mistake has been combining a very dark shade with a very glossy finish when I didn’t want the lips to dominate.
That doesn’t make either choice wrong. It tells me what I want to adjust.
For an eye-focused version of this look, I’d begin with a cream or satin lipstick, applied lightly and blotted if needed. You can keep the color without the highly reflective finish.
Revlon Super Lustrous Lipstick is a drugstore range worth browsing. Rose Velvet and Rum Raisin are shades to compare against your own lip color and complexion. Make sure you’re looking at the intended formula: Super Lustrous lipstick and the Glass Shine range are different choices.
A shade name or online swatch can only take you so far. A lipstick that looks like a quiet nude on one person can look quite pale or quite deep on someone else.
If your lipstick seems disconnected from your face, try a liner close to your natural lip outline and blend it inward before applying the lipstick. You can also use a lighter layer rather than immediately deciding the shade is unusable.
If you love gloss, keep it. A small amount over a balanced color may give you exactly the finish you want. I just wouldn’t add it automatically because a tutorial says every look needs a glossy lip.
Adapt the colors instead of copying someone else’s face
The most useful part of an old money makeup tutorial is the relationship between the features: how much contrast sits at the eyes, how visible the blush is, and how the lip connects to the complexion.
Copying the exact beige lipstick from a fair-skinned reference image won’t necessarily reproduce that relationship on deeper skin.
These are starting points for experimenting, rather than fixed rules:
Find your color direction
| Skin depth | Eye shades to explore | Cheek & lip directions |
|---|---|---|
| Fair to light | Taupe, soft brown, muted rose-brown | Soft rose, peach, pink-brown, or muted mauve |
| Medium to tan | Cocoa, bronze-brown, deeper taupe | Rosewood, warm rose, terracotta, or caramel-brown |
| Deep to rich | Espresso, deep bronze, plum-brown | Berry, brick, rich rose, or deeper brown-based lips |
Starting points, not rules. Your undertone and natural lip color matter too.
Undertone and natural lip pigmentation matter within every row. Olive skin, for example, can occur at different depths; “medium” doesn’t automatically mean warm.
For Black women with deeper skin, understated makeup can still involve richly pigmented blush, a deep liner, and a visible lip color. A very pale product may look chalky rather than subtle. Choose enough depth to create the effect you want, then control how much you apply.
The same principle applies to high-contrast features at any skin depth. You may need a stronger brow, darker liner, or richer lip than the person in your reference photo.
Softness comes from the finished balance. It doesn’t require making every color pale.
My approach to evening: deepen what is already there
For special occasions, I don’t make a dramatic departure from my everyday preferences. I make the eye makeup darker, the wing more exaggerated, and the overall effect a little smokier.
You can use that approach without rebuilding your whole face.
Add deeper shadow near the outer upper lash line and blend it into the existing color. Extend the wing a little if you want to. Check the lower lash line before adding darkness there too; you may already have enough definition.
Then look at the face as a whole before increasing the blush, contour, and lipstick.
If the eyes have become the focus, the existing lip may still be exactly right.
Alternatively, keep the eyes simple and choose a more defined rose or red lip for dinner. Old money makeup looks can include a statement lip; the aesthetic doesn’t come with a ban on color.
A realistic ten-minute version
Once skin preparation has settled, this is a useful way to divide the makeup time:
Your ten-minute routine
| Time | Where to focus |
|---|---|
| 0–3 minutes | Thin base where wanted, targeted concealer, and selective powder |
| 3–4 minutes | Brush and lightly define brows |
| 4–7 minutes | One shadow, liner, and mascara |
| 7–9 minutes | Blush and optional contour |
| 9–10 minutes | Lip color and a final check |
Begin after skin preparation has settled. Take longer if you need to, and skip the steps that don’t serve your look.
This is a guide, not a test. If a wing takes longer while you’re learning, give yourself longer.
On a rushed day, skip the separate shadow or contour. Keep the steps that make the biggest difference to you.
When the result feels heavier than you intended
Before starting again, identify the part that is bothering you.
If the base looks thick: lift a little excess with a clean, slightly damp sponge rather than adding another layer to smooth it out.
If the eyes look too severe: soften the liner’s outer edge with a small brush while it is still workable. Next time, begin with a thinner line or concentrate it toward the outer lashes.
If the lipstick washes you out: reconsider its depth and undertone. A more suitable liner or a richer shade may help more than extra gloss.
If the blush looks like a separate patch: use your clean blending tool to soften the boundary before applying more complexion product over it.
If everything feels equally strong: stop adding. Choose which feature you want to keep prominent and soften one of the others.
That last check is the one I’d keep coming back to. I like makeup with definition. I just want the definition to feel considered.
Spend on what you enjoy, not on the name of the aesthetic
I understand the appeal of a beautifully named product. Surratt, Chanel, and NARS all have that pull for me in different ways.
But enjoying the world around a product and needing the product are separate decisions.
A luxury blush can be a lovely purchase if you genuinely want it and will use it. An affordable mascara or lipstick can sit beside it without making the finished look less elegant.
Start with the textures and colors you already know you like. Replace a missing or unsuitable item, rather than buying a whole “old money makeup” collection.
That’s the same principle behind my frugal chic starter kit: small choices that have a place in your actual routine.
Once the makeup is finished, the jewelry you regularly wear can do the rest. There’s no requirement to turn a ten-minute face into a full transformation.
For me, the look comes back to defined eyes, a little color in the cheeks, and lips that feel comfortable sharing the attention. For you, the balance might be different.
Keep the part that makes you feel like yourself.