10 Easy Nail Art Ideas with Household Items
Get creative with DIY nail art using everyday household items. Fun & trendy designs like aura nails, animal patterns, florals, and more — no salon tools needed.

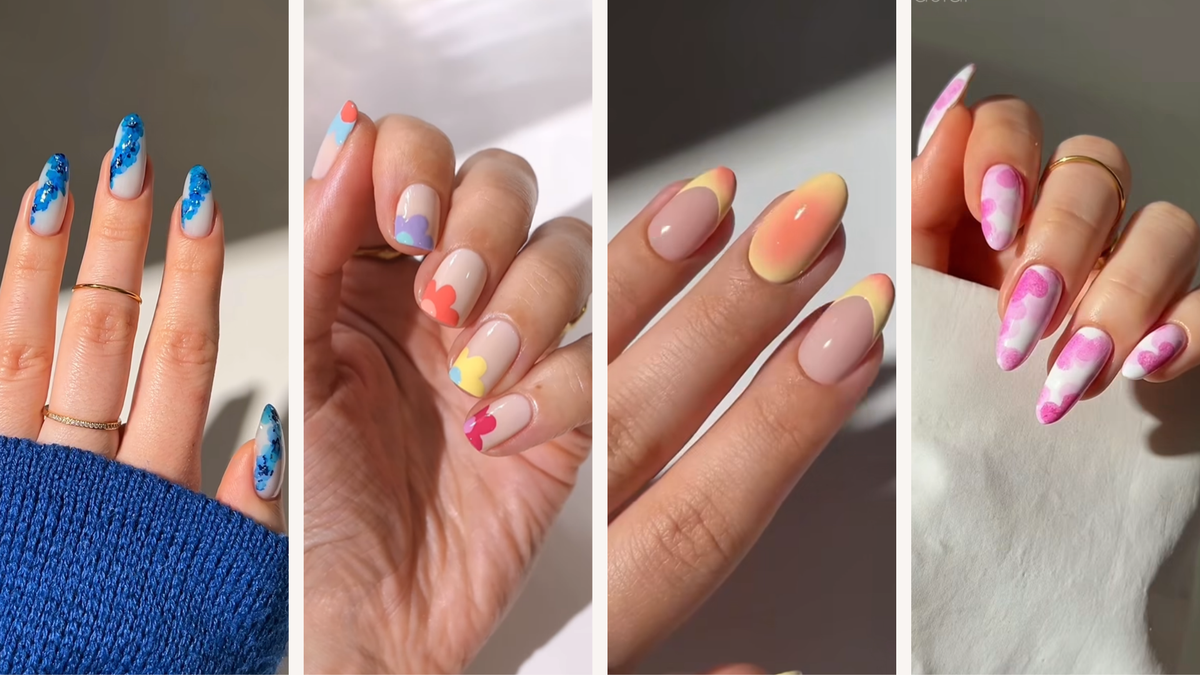
Nail art doesn’t always have to be about fancy tools or salon visits — sometimes the most fun designs come from using what you already have at home. Turning everyday household items into nail art tools is not only budget-friendly but also a creative activity that lets you experiment and play with different styles. Learn how to do nail art without any specialized equipment below!
'70s Flower Power

Credit: danaturenails
This simple and cute design doesn't require any tools at all!
Steps
- Apply a base coat in a neutral color.
- Make 3 small strokes at the edge of your nail to resemble flower petals.
- Use a different shade to create a dot where the three petals meet at the edge.
- Seal with a top coat.
More Ideas
You can use this freehand application to create many simple forms, like curves and lines.
Stamped Hearts

Credit: nailsbypaular
This gorgeous bokeh effect needs just one additional item:
- A sponge (preferably a dense one)
Steps
- Apply a base layer in a light color.
- Freehand a heart shape onto the sponge with nail polish.
- Alternatively, use a blade to carve a heart shape onto the sponge.
- Stamp the heart shape onto your nails, and apply more nail polish onto the sponge whenever required.
- Seal with a top coat.
More Ideas
You can use this technique to create stamps of shapes, letters, etc.
Sponge Aura Nails

Credit: simlynail
One of the most popular nail trends of 2025 is unbelievably easy to achieve! all you need is:
- A dense sponge
Steps
- Apply the lighter shade in the color combination as your base coat, and let it dry.
- Dip your sponge in water to make the gradient smooth.
- Apply the lighter color first.
- Apply the darker shade on the remaining portion.
- Tap the sponge onto your nail.
- Seal with a top coat.
More Ideas
This technique can be used to create gradients, ombre French tips, etc.
Marble Nails

Credit: nailart_cart
This is one of the easiest ways to achieve a marble nail. Get your hands on:
- A safety pin
Steps
- Apply a generous amount of nail polish to your nail, and do not spread it.
- Repeat the above step 1-2 times more, depending on how many colors you want to use.
- Use a safetypin to spread the wet polish around with a wavy motion.
- Seal with a top coat.
More Ideas
You can use this technique to create several patterns like starburst, petals, zig-zag, and galaxy.
Cow Pattern

Credit: merajfatima._.mf
One of the defining patterns of Gen Z, this nail design is very easy. You need
- A toothpick
- A matchstick
Steps
- Apply a white base coat.
- Dip the flammable part of your matchstick in black paint and make irregular spots.
- Dip the tip of the toothpick in black paint and make some tiny spots on the remaining white portion.
- Seal with a top coat.
More Ideas
You can use these items as dotting tools to create polka dots and leopard design, two of 2025's most popular patterns.
Eye Shadow Gingham

Credit: abe.nailbabe
This is one of the easiest ways to get gingham nails. All you need is:
- Eyeshadow
Steps
- Apply a white or nude matte base coat, let it dry.
- Apply eyeshadow on the entire nail.
- Using a transparent polish, make some vertical lines on the nail.
- Wipe away the remaining eyeshadow once the transparent top coat has dried.
- Apply another layer of eyeshadow.
- Make some horizontal lines with transparent polish.
- Wipe away the remaining eyeshadow.
- Seal with a top coat.
More Ideas
You can create gradient nails and a watercolor effect with this hack.
Alcohol Marker Nails

Credit: nailsbypaular
Another ingenious hack that makes for surreal nail art! You need:
- Alcohol markers
- Toothpick
Steps
- Apply a light base coat.
- Diagonally apply the marker across the nail, making irregular dots.
- Using a darker shade of the same color, apply sparingly on top of the existing pattern.
- Apply a transparent top coat.
- Use a toothpick to apply small amounts of glitter polish on the nail for a pop.
- Seal with a top coat.
More Ideas
Alcohol Markers can be used for floral nails, galaxy patterns, and abstract watercolor effects.
DIY Nail Stickers

Credit: abe.nailbabe
Making nail stickers is surprisingly easy! You require:
- Ziplock bag
- Punching Machine
- Acetone
Steps
- Clean the surface of a Ziplock bag with acetone,
- Apply an even layer of nail polish on the Ziplock bag. Let it dry thoroughly.
- Peel off the dried polish.
- Use a punching machine to make cutouts.
- Place the stickers on a wet/tacky base layer.
- Seal with a top coat.
More Ideas
With these nail stickers, the sky is the limit. Create unique designs using different types of polishes and punching machines.
Pin Flowers

Credit: the_beauty_allure68
This simple design is quick and subtle. You need:
- A safety pin
- A toothpick
Steps
- Apply a bright base coat.
- Dip the tip of your safety pin into nail paint of another color.
- Horizontally place the painted tip onto your nail.
- Repeat it 4 times to make a "plus" sign.
- Make a few of these flowers.
- Dip the tip of the toothpick into a different color.
- Vertically place the tip onto the center of the flowers one by one.
- Seal with a top coat.
More Ideas
You can make dashed lines, leaves, and flowers with any number of petals.
Q-Tip Florals

Credit: the_beauty_allure68
This fun and creative floral design is easier than it looks. Grab these:
- A Q-Tip
- A safety pin
- A toothpick
Steps
- Apply a base coat of a light color.
- Apply nail paints of two different shades of the same hue on a plastic surface.
- Use the Q-Tip to mix the two and create a gradient.
- Stamp the Q-Tip onto the corners of your nails to create individual petals, keeping the darker side on the outside of the flower.
- Dip a safety pin into green paint and apply it horizontally to make leaves.
- Apply white or yellow nail paint on the tip of a toothpick, and apply it to the centre of the flowers.
- Seal with a top coat.
More Ideas
Use Q-Tips to create different abstract designs.
With these ingenious ideas, let your nails reflect your creativity. Your next favorite nail design might already be at home.


